Google AdSense kaise Apply Karte hain Janney Ke Liye Step By Step Fllow Kare
Toh cahliye shuru karte hai .
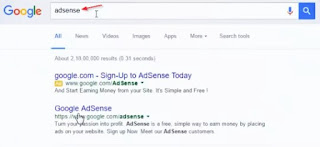
Step-1 Sabse pehle aapne
Google ke search Engine par jakar Adsense search karna hai. Search karne ke baad jo pehli website
(www.google.com/adsense ) show karegi us par aapko click karna hai.
 |
| Google Dashboard |
Step-2 : Ab aapke samne ek google ka home page khul jayega. Isme aapko Sign up now par click karna hai.
 |
| Sign up Now par click kare |
Blogger Template Se Navbar Ko Hide Or Remove Kaise Kare Puri jaankari Hindi Me
On Page Seo-Apne Post Aur Page Ko Full Optimize Kaise Kare
Step-3 Sign up now par click karne ke baad aapke samne ek page khul jayga, jis par Sign in aur Create account ke do button hoge. Agar aapka ko gmail account/ID nhi hai toh aap create account par click karke aapni gmail ID bana sakta hai.
Yadi aapke pass
already gmail id hai, toh aap usse adsense par apply karne ke liye sign in par click karte hai
 |
| Sign in |
Step-4 : Sign in par click karne ke baad aapke samne gmail ID ka ek form bana aa jayga. Jisko bhar kar aap next step par ja sakte hai.
 |
| Add email address |
Dusre form me aap dekh rahe hai ki gmail 2-Step
Verification code mang raha hai. Ye ek parkar ka
security code hota hai, jo aapke mobile par sms ya call ke jariye aata hai. Jisko confirm karne ke baad hi aapki gmail id open hoti hai.
Blog Teamplates Download Karne ke Liy Best 15 Website Hindi Help Se
5 software Jinki Jarurat Har Blogger Ko Hoti Hai Aur Download Kar Ley
Step 5: Email ID me login karne ke baad aapke samne ek form bana hua aa jayga. Jisme website aur content language select karni hoti hai.
Maine aapni website ka naam
hindihelpse.com daala hai aur content language me Hindi language ko select kiya hai . India me jaadatar hindi language hi chalti hai. Uske baad neeche diye gaye continue button par click par karke aap next
step par ja sakte hai.
Step-6 : Continue par click karne ke baad google aapki information mangta hai. Jisko aapko bilkul perfectly fill karna hota hai. Kyuki isi information se google aapke account ko handle karta hai aur isi information se aapko google dwara paise bhi aate hai.
Blog Ke Template Ko Mobile Friendly Kaise Banate Hai Uski puri jankari hindi me
Hindi Aur English Kaun Si Language Me Blloging Karni Chahiye
Contact Information :
- Country or territory: Isme aap sabse pehle aapne country ka naam fill up karte hai.
- Time Zone : Jaise ki humne pehle column me India fill up kiya hai toh hum is column me (UTC +5:30) select karte hai ( ye India ka time zone hota hai)
- Account Type : Is column me aap apne account ka type likh sakte hai. Ex : agar aap ko company run kar rahe hai toh
- Business option ko select kar sakte hai. Agar aap akele kaam karte hai, jaise ki aap Blogging akele hi karte hai toh aap
- Individual select kar sakte hai.
- Payee Name : Is column me blogger apna pura naam daalte hai.
Address :
- Street Address : Isme aap apni road ( jaha par aap rahte hai ) ka naam daal sakte hai.
- City/Town : Apni city ka naam daalte hai.
- State : Apne state ka naam daalte hai.
- Pincode : City ka Pin code ( Postal Code ) daalte hai.
- Phone No : Is column me aap apna apna Mobile Number daal sakte hai.
- How did you get to know adsense : Iska matlab hai ki aapko adsense ke baare me kaha se pata chala isme aur bhi bhut se options hai lekin maine isme Online forum or blog daal hai means ke mere ko online blog se adsense ki jaankari mili hai.
- Adsense Email preference : Isme aap sabhi options par yes karna hai.
- Submit : Poore form ko fill karne ke baad aap Submit button par click kar sakte hai.
Step-7 Submit par click karne ke baad aapke samne ek page khul jaata hai jo ki Goggle Adsense ki terms and conditions ko dikhata hai.
In Terms and Conditions ko padne ke baad aap neeche Yes, I have read and accept the agreement par click karte hai.
yes par click karne ke baad aap neeche diye gaye Accept button par click kar dete hai.
Jaise hi aap Google ki
Privacy Policy ko accept karte hai toh aapke samne
Google Adsnese ka
Dashboard khul jaat hai.
Jo ye dikhata hai ki aapka Google Adsense Account ban chuka hai.
Ab aage ka kaam google ki team karegi, jo
12 se 24 hours se ander aapki Adsense Approval Application ko review karegi aur uske baad aapko feed back degi ki, aapki Application Approve kar li gayi hai ya nhi .
Agar
Approve nhi hua hai toh sath me reason bhi likh kar bhejegi.
Ye first stage hoti hai review system ki dusri baar google team tab review kargi jab aap apni website par ads code generate karoge ya ads lagaoge.
Lekin ye sab tabhi sambhaav hoga jab aapka adsense account approve ho jayega.


Comments
Post a Comment